

Facebook is a great way to promote your hair or beauty business but it can be complicated to manage. Luckily there is Facebook Business Manager – a handy tool that allows you to manage your pages, ads, billing, and keep all your assets in one place.
Learn more about how to set up your Facebook Business Manager with these expert tips.
What is Facebook Business Manager?
Facebook Business Manager is a free business tool to manage all of your marketing and advertising activities for your salon, spa or clinic in one spot. Here are the key features:
- It separates your personal Facebook account from your business account in a safe and organised way.
- You can assign different levels of access to your employees, external partners or freelancers to help manage your pages, ads and assets.
- It makes it convenient for you to create, schedule and publish posts on Facebook and Instagram.
- It keeps the most important things top of mind, including messages, comments and more.
- It’s a one-stop shop to create and track the performance of your Facebook ads.
How do I set up a Facebook Business Manager?
Here are 5 expert tips to get you started with Facebook Business Manager.
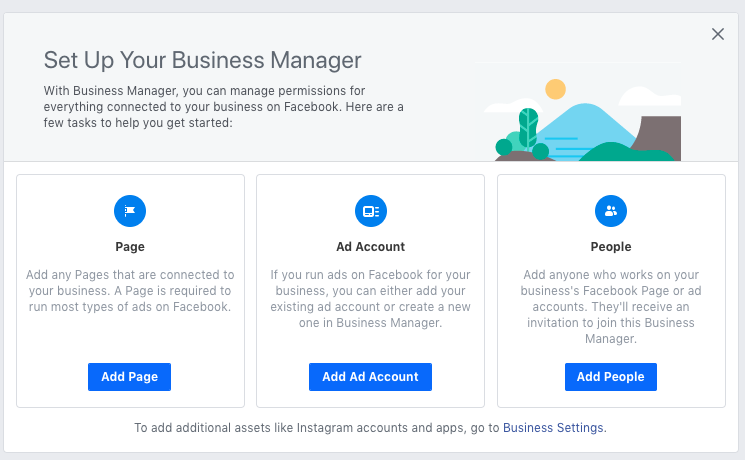
Tip 1: Create a Facebook Business Manager account
- Go to business.facebook.com and click Create Account.
- Log in using your username and password for your personal Facebook account (don’t worry, other team members can’t access or view your personal Facebook profile from this page).
- Enter the name of your hair salon, spa or beauty clinic, your name, and the business email address you want to use for your new Business Manager account.
- Add details of your business including address, phone number and website.
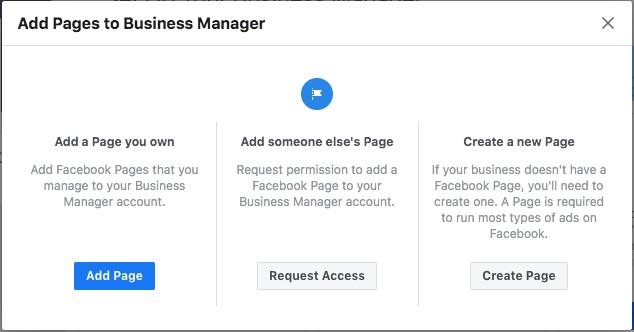
Tip 2: Add your Facebook business page
Next, you’ll need to ensure you have an existing Facebook business page for your salon or create a new one. Then you’ll need to add it to your Facebook Business Manager. Make sure you are an admin in your Business Manager account. If you are creating a new Facebook business page, check out handy tips about the Facebook basics.
If you already have your Facebook business page ready to go, follow the steps below:
- Click Add Page from the Facebook Business Manager dashboard. Then click Add Page again in the pop-up window.
2. Enter the name of your Facebook business page or URL and it will pop up on the screen. Then click Add Page. You should then see your Page on the next screen.
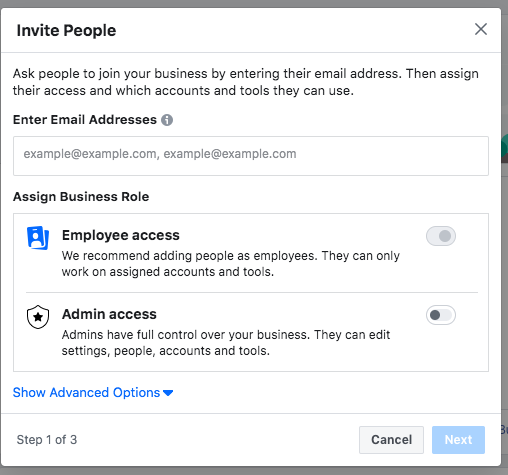
Tip 3: Add people to your Facebook business page
Facebook Business Manager allows you to add other users to help you manage your Facebook business page and advertising campaigns. This can be your staff, a business partner, or a marketing freelancer.
- To get started, go to Business Settings. Click People, then Add. Enter the work email address of the person you wish to add.
- Assign the level of access you want them to have: choose either Employee access or Admin access.
- Select Pages from the left-hand menu. Then, choose your salon’s or clinic’s page. Use toggle switches to customise their access. Click Invite.
- Next, your team member will receive an email from Facebook with a link to accept your invitation and instructions on how to get started.
When an employee leaves your salon, spa or clinic, you can revoke their permissions. Here’s how it works:
- Click Business Settings in the top left corner of your Business Manager dashboard.
- Click People on your left.
- Now choose the name of the user you’d like to revoke permission and click Remove.
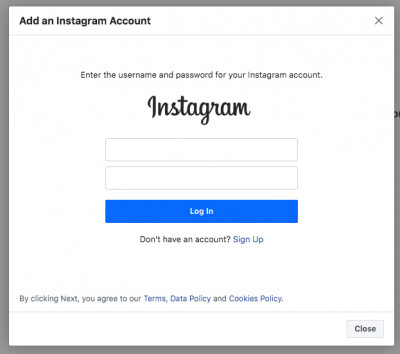
Tip 4: Connect your Instagram account
It’s a good idea to connect the Instagram account of your salon, spa or clinic to your new Facebook Business Manager. It will allow you to respond to all comments, get insights and track ads on both platforms conveniently in one spot. Here’s how to do it:
- When you are in Business Manager, click Business Setting at the top left.
- Choose Instagram Account and then click Add.
- Enter your Instagram login details in the pop-up window and click Log In.
Now you will be able to see information and activity from both of your accounts on Facebook and Instagram.
Tip 5: Keep your account secure
To keep your Facebook Business Manager account safe and secure, set up two-factor authentication. Follow these steps:
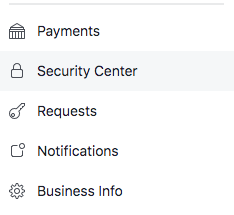
- Go to your Business Manager and click Business Settings.
- Select Security Center from the left menu. Go to Business Info and click Edit.
- Below two-factor authentication, choose Required for everyone or Required for Admins only. Click Save.
Do I really need Facebook Business Manager?
In short, get the most out of Facebook and Instagram by using Facebook Business Manager to promote your hair salon, spa or beauty clinic. Facebook Business Manager allows you to have one central location to manage your social media assets, ads, and insights on your marketing performance. An added benefit is that Facebook also introduces new features regularly to make it easier to manage your Facebook and Instagram accounts.
Streamline your marketing efforts
Did you know that Kitomba Salon and Spa software has marketing integrations that enable you to take care of your digital marketing automation in one place?
You can set up automated emails and SMS messages, manage client details, create segmented email marketing lists, and so much more.
Kitomba is a complete salon and spa management system that has helped thousands of salons, spas and clinics grow successfully since 2002. It gives you all the tools you need to manage your business day-to-day, which gives you more time to dedicate to your clients and grow your business.
Want to learn more? Book your free personalised demo to see how Kitomba can help your business thrive.
Read next: